
As much as our 1975 GMC Eleganza 2 bring us joy and we are looking forward to on road adventures, it also challenges us as we upgrade to current technology and make it a more comfortable and safer ride.
As I mentioned before we were concerned about the understeer and wandering, giving us the feeling when driving that she was not as responsive to turning as she needed to be. For people that aren’t drinkers – a cool beer was necessary after driving to calm the nerves!

After visiting a few public forums on the GMC and picking through the advice of those that guessed and those that had similar experiences we started with verifying proper air pressure in the tires. We contacted BF Goodrich and this was their response:
The amount of air pressure required in each tire on an RV depends on the weight of the fully loaded vehicle. Therefore, the RV has to be weighed loaded by individual wheel position. Correct procedure on weighing the RV can be found in our RV Tire Guide under “How To Weigh The Recreational Vehicle”. Once the actual corner loads are known, the correct air pressures can be determined. Use the RV load and inflation table (http://www.michelinrvtires.com/michelinrv/toolbox/reference-material.jsp ) to establish the air pressure for the heaviest side of the RV. Match the opposite tire(s) across the axle with the same pressure. It is acceptable to add a small amount of additional pressure as a safety margin.


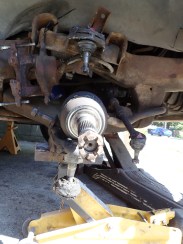
Of course….as in any restoration/modification process this was just one step in the journey to a smooth ride. While the brake pads have plenty of meat left on them, there was a lot of play in the hubs/bearings. Taking out the bearings was a challenge and took some creative engineering to create a tool to pull them off the hub and put the new set back in – it can be done without buying the $500+ tool most insist you must have but it was definitely a job!
")
")
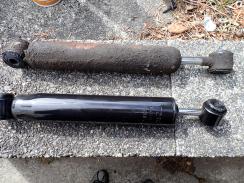
We then replaced the upper control arm bushings with concentric control bushings to provide more castor. We also replaced the front shocks, the steering stabilizer shock (damper) and the sway bar link bushings. This was all done in our shop and driveway – a DIY project with no special tools – well, beyond the tools we have collected over the years and 40 plus years of hands on mechanical experience. If you have questions that require more detail please comment and we will answer as well as we can.
After everything was installed we set the camber with a regular bubble level by turning the adjustment bolts. Without having a tool to readjust the castor we made an appointment with our local Les Schwab (well not too local as not many have bays large enough for an RV in the Seattle area). Driving to the shop we noticed immediately how much better she handled. The shocks alone made for a much smoother ride and there was no fighting the wheel to keep her centered in the lane. The difference in handling and riding was so much better, there was no prying our fingers off the wheel or dash when we arrived!


The excitement of aligning an older, unique rig wore off quickly for the young man assigned our GMC. The software for the Hunter alignment equipment is limited in the vehicles it will service – GMC motorhome isn’t in the database! We suggested putting in the specs for a Toronado or Cadillac but they weren’t in there either. After over an hour we all decided it wasn’t going to get done without a base point to go on, which was fine, there was no charge for the time and we were able to get inside the ‘pit’ to give everything a quick look over ourselves, much easier then under jacks in the driveway! It’s back to ebay to find some alignment equipment for another DIY project – and perhaps a new mobile career!
Parts we used from Amazon: Gabriel 14010 Steering Damper, Moog K7104 Control Arm Offset Bushing Kit, Timken 5123 Seal, National 5109 Oil Seal
The shocks we ordered from RockAuto KYB KG5435 and KYB KG5436
We are very happy with how our ol’ girl is handling. We will be replacing the rear shocks soon but for now… it’s smooth sailing.
#GMCMotorhome #Eleganza2 #DIY #Restomod #castor #camber #alignment #drivewaysurfing #bfgoodrich #dampershock #Gabriel14010SteeringDampers #MoogK7104ControlArmOffsetBushingKit #Timken5123Seal #National5109OilSeal @rockauto.com

Did you know that there is a vast resource available at GMCMI.com? One of many tools you can borrow is the front wheel bearing tool set. You can also borrow a jig to drill the knuckle for a grease fitting so the bearings don’t have to be opened up for repacking. You also have to know to center the steering box to get it on the high center. There is a lot to know and the whole set of manuals (that include the front end set up data) can be downloaded.
LikeLike
Yes we read a lot before digging in. It’s good for everyone to share their experiences and knowledge on these GMC Motorhomes. Not just one way to get the job done. Thank you for commenting.
LikeLike